

The Void Within: Attack on Altador
Introduction

Much like the other Void Within games, Attack on Altador draws inspiration from a classic Neopets favorite. This time, its gameplay mirrors none other than Neopets’ very own Biscuit Brigade, giving players a familiar, yet fresh challenge to enjoy!
In Attack on Altador, players face a thrilling 5-wave tower defense adventure. Swarms of mischievous shades are determined to steal your precious resources, and it’s up to you to stop them. Each wave increases in difficulty, with clever enemies that test your strategy and quick thinking.
To defend the city, you’ll need to carefully place a variety of defensive blocks and towers along the paths. Each tower is unique and positioning them strategically is key to preventing the shades from reaching their goal. Timing, placement, and resource management all come into play, making every decision important for keeping Altador safe.
How It Works
Attack on Altador begins by giving you 30 tools to build your towers and roughly 15 seconds to place them in each building phase. (Because the game can be a bit laggy, you’ll actually have more time to set up your defenses, but it’s best to be as quick as possible in case the game is ever optimized.)
If you ever need a break to think—or just to step away—you can hit the pause button in the top right corner of the screen to freeze the action. On the other hand, if you’re confident in your setup and eager to jump straight into the action, the skip button (just to the left of pause) lets you start the next wave right away.
Pause
Skip
There are four basic types of towers you can choose from:
| Tower | Cost |
|---|---|
 |
1 Tool |
 |
4 Tools |
 |
4 Tools |
 |
1 tool |
Three of the four towers can be upgraded to increase their effectiveness. The scarecrow can be upgraded once to improve its durability, while the Archery and Flatrock towers can enhance their range and the type of projectile they launch. Both the Archery and Flatrock towers have two separate upgrade paths, and each tower can be upgraded a maximum of two times along a chosen path.
| Tower | Upgrades |
|---|---|
| Archery (Path A) | Water Thrower > Baelia's Net Slinger |
| Archery (Path B) | Altador Crossbow > Altador Artillery Tower |
| Flatrock (Path A) | Cannon > Farmer Follie's Windmill |
| Flatrock (Path B) | Sludge Potion Slinger > Fire and Ice Negg Tower |
Throughout the game, you’ll face three different types of enemies that emerge from the Void Rifts. Each enemy brings their own challenge to the battlefield. With every new wave, the shades grow stronger and tougher, making it increasingly difficult to hold your defenses and keep Altador safe. Below is a detailed explaintion of what to expect for each wave.

Voidling

Prowler

Sefira

Void Rift
| Waves | Shades | Total Shades |
|---|---|---|
| 1 | 10 Voidlings | 10 |
| 2 | 15 Voidlings | 15 |
| 3 | 20 Voidlings & 5 Prowlers | 25 |
| 4 | 25 Voidlings, 10 Prowlers, 1 Sefira | 36 |
| 5 | 30 Voidlings, 15 Prowlers, 5 Sefira | 50 |
Strategy
There are plenty of different strategies to beat Attack on Altador, and tower setups can vary based on playstyle. The method below is one we’ve found to be especially reliable. A big thanks to fellow Neopian gerald1992 for the inspiration behind this setup!
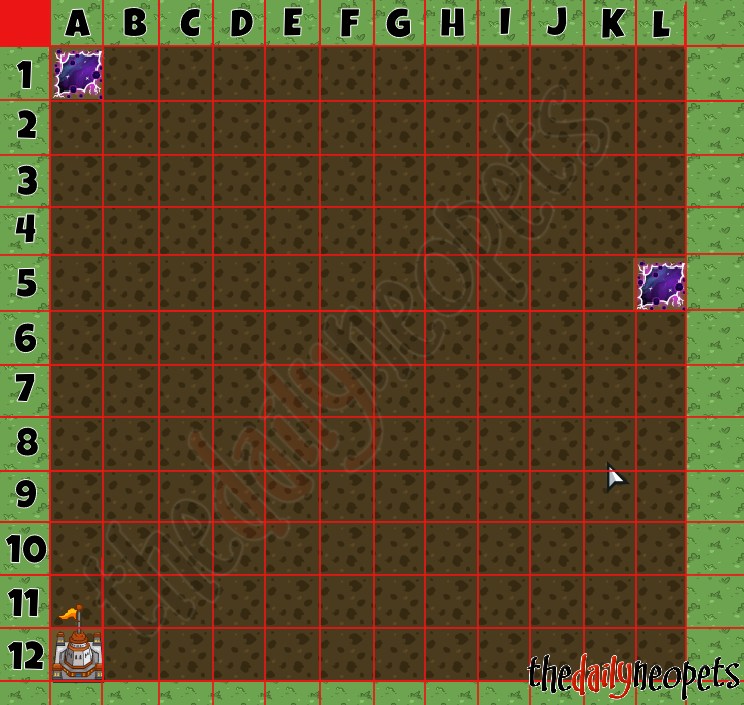
To make things easier, we’ve included a grid image of the battlefield along with a detailed step-by-step guide to walk you through each wave.
Step-by-Step Guide
- Step One: During Wave 1’s Building Phase, start by placing blocks in these positions: A11, B11, D12, E11, F10, G9, H8, H7, H6, and G5.
- Step Two: Place your Archery Towers in C10, D9, E8, and F7. After setting them down, upgrade the range once for the towers at C10, D9, and E8.
- Step Three: When the wave begins, place a Scarecrow at H9. As soon as the first shade attacks the scarecrow and the block around it turns red, quickly demolish it to recover your tool. The shade will continue along the path toward your castle. Once that shade reaches about 3–4 squares from where your scarecrow was (around I6), replace your scarecrow. Repeat this demolish-and-replace method throughout the round. Be careful not to let the scarecrow get destroyed early-on, as losing tools will hurt your defenses.
- Step Four: Once you earn more tools, upgrade the range of the tower at F7 to strengthen your funnel of defense.
- Step Five: At the start of Wave 2, destroy the block at H8 and replace it with an Archery Tower. Immediately give this new tower one range upgrade. Continue using the scarecrow method and place additional blocks as you gather tools. By the end of Wave 2 (or early in Wave 3’s Building Phase), you should have blocks at A6, B5, C4, D3, E3, and F5.
- Step Six: Next, begin adding three more towers along your funneled path in E5, D6, and C7. Each of these towers should eventually be upgraded with one range boost, likely during Wave 4’s Attack Phase.
- Step Seven: After Wave 3 or 4, you can start placing your scarecrow slightly further in to extend the shades’ path. Good placements are around G10 or F11, depending on how the wave unfolds.
- Step Eight: Place one final block at C8. At this point, you have your key funnel path built before Wave 5 begins. If desired, you can continue upgrading your towers’ range or even swap out some blocks for towers to speed up enemy takedowns. The most important part is keeping this path intact.
- Step Nine: By this stage, you can beat the game as long as you continue using the scarecrow strategy. From here, it’s all about personal preference. You may upgrade towers down specific paths, adjust placements, or reinforce defenses to your liking.
- Step Ten: For a recommended strategy, consider upgrading the towers at E5 and H8 into Water Throwers with maximum range. Then, during Wave 5’s Building Phase, replace the block at H7 with a Flatrock Tower, upgrade its range fully, and eventually advance it into a Cannon as you earn more tools. This setup creates a powerful defense line to carry you through the final wave.
Overall your final set-up should look something like this:

Things to Remember
- Manage your tools carefully early on — every placement and upgrade matters.
- Don’t let your scarecrow get destroyed early, or you’ll lose valuable tools.
- Use the demolish-and-replace method with your scarecrow to keep enemies looping. This works through all 5 waves.
- If a scarecrow survives until the end of a round, demolish it during the next Build Phase. Replace it as soon as the new wave begins — this gives shades time to spawn and head straight toward it.
- Shades always follow the path of least resistance, which is why funneling them with blocks and towers is so effective.
- Towers are fully built and ready to fire once the block around them turns a light brown color.
- Upgrade range on key towers first to maximize coverage.
- It’s okay to adapt your setup as the game progresses! Several different set-ups work, just find what you prefer!
Rewards
There are a total of 32 prizes to collect in Attack on Altador, including 7 that are exclusive to the game. Each day you successfully complete a game, you can earn one item prize along with 10 Plot Points (or 20 if you have the Plot Points Fortune Cookie active), provided you haven’t yet reached the 4000-point chapter maximum. Premium members enjoy an extra bonus, receiving two of whichever prize they earn, doubling their rewards!


Fearless Deeds & Avatars
There are two Fearless Deeds available for Attack on Altador. First is the Towering Defender Fearless Deed; earned by succussfully winning a game of Attack on Altador without any of your resources being lost to the void rift. Second is the Honourary Protector of Altador Fearless Deed; earned by defeating a total of 500 shade across all your playthroughs. If you play through all five rounds during a playthrough you'll have defeated a total of 136 shades, so you'll need to playthrough a full game at least 4 times to finish this achievement. To learn more about these Fearless Deeds, check out our guide.


The Best Strategist avatar is awarded for completing 3 consecutive games of Attack on Altador in a single Neopian day. To earn the other available avatar is Clever Strategist and is awarded by typing "defeatvoid" during the game and finishing it, either by ending the game in Wave 2 or clearing all 5 waves. Make sure to earn the Clever Strategist first, as Best Strategist will not be awarded at the same time, even though the pop-up notice indicates they're both awarded.


Make sure to check off your new Best Strategist avatar and your Clever Strategist avatar.
Alerts
 The Snowager
Snowager is sleeping!
 Next Possible Wake
Jul 21: 1 AM/PM NST
Jul 22: 6 AM/PM NST
Jul 23: 11 OR 12 AM/PM NST
Jul 24: 4 OR 5 AM/PM NST
 Obelisk War: Battle
Next cycle: 0d, 1h, 51m
Neopia Today
The Runway Contest

Recently At Forums
- Tuesday, July 21
- Neolodge Gets Makeover
- New Petpetpet Removal Tools
- Vote for the obelisk War! Round 342
- Monday, July 20