

Snot Splatter
| Link to Game | Trophies | Avatar(s) | ||
|---|---|---|---|---|
Play now!  |
   |
There aren't any avatars from this game. | ||
| Difficulty Meter | Neopoint Ratio | |||
|
We rate this game medium.
|
 NP Ratio: 16.67 16670 pts :: 1000 NP |
|||
Introduction
In Snot Splatter, you may find yourself in a rather sticky situation. Meuka has continued his plans for world domination by creating sticky webs full of mucus in the Haunted Woods, and if any Neopets or Petpets get stuck in his webs, they'll be trapped for hours. The goal in this game is to clear the board and destroy his sticky webs by "blowing up" blobs of snot -- literally!
Controls & Instructions
In this game, the only thing you'll be using is your mouse.
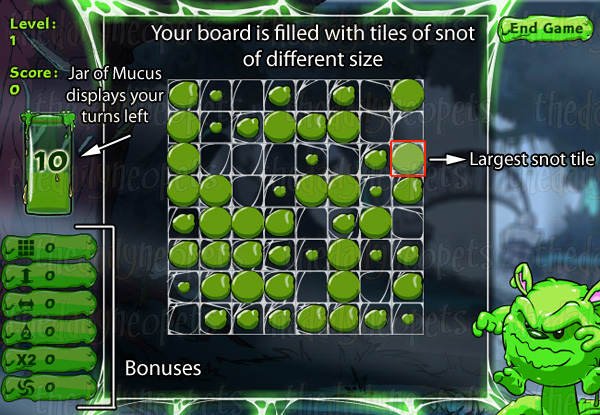
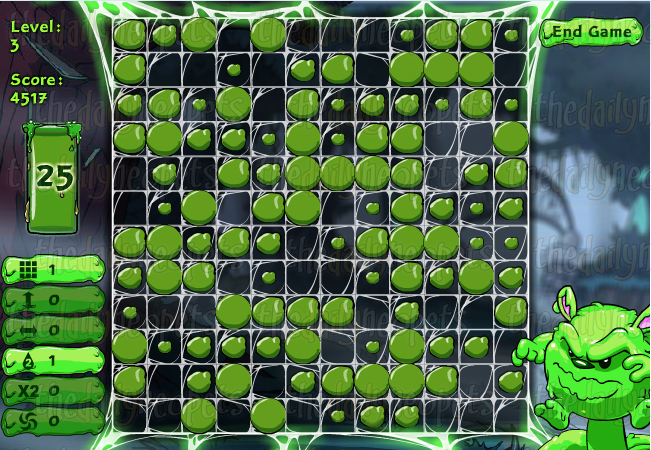
The first thing you will notice is the individual tiles of snot. The larger blobs of snot will take up a larger portion of one tile, whilst the smaller blobs will be exactly that -- smaller. When you "blow up" a blob of snot (blow up the larger ones first), it will release four droplets in all four directions (up, down, left, and right). If a droplet hits another large blob that's about ready to explode, it'll pop, releasing another four droplets, thus creating a chain reaction.
On the left side of the screen, there is a jar of mucus with a number inside of it. This number is the amount of clicks left before you're out of moves (and the game ends). It decreases by one every time you click a snot blob; it increases by the number of blobs broken within a combo when you create a chain reaction. Your available droplets at the beginning of each level are equal to the number you finished the last stage with. If you finish Stage 1 with 15 droplets in your meter, you start Stage 2 with 15 droplets in your meter. The maximum number of droplets you can hold in your meter at one time is 25.
Below that jar are your bonuses. Click one to activate it, then click a tile to use that bonus selected.
Bonuses
From top to bottom, these are the bonuses and how they function:
- 3x3 Box: This clears a total of 9 tiles (3x3). Do not clear bigger blobs (they create great chain reaction combos) with this; clear groups of SMALLER blobs.
- Column clearer: Column clearers destroy an entire column of blobs.
- Row clearer: This destroys an entire row of blobs.
- 2x snot: The forth bonus adds two droplets of snot to the blob clicked, as well as every other blob in the combo.
- 2x points: This doubles the points you receive in a combo.
- Portals: This allows you to place two portals (one beginning, one destination) on the board. If you position one by a blob that's ready to explode and the other by other blobs that are about to explode, it'll provide a great chain reaction combo.
Scoring
The scoring for each combo, as pointed out by Ur_Drago, increases the more blobs you break. The scoring works as follows:
Score= breaks x ([breaks +1]/2)
What this means is that the scoring is sequential. Each blob that breaks is worth the number of points that corresponds to it's breaking order, and all the points in a combo are added together to give you the score for that combo. For example, if you have a 7-blob combo, the first break will be worth 1 point, the second break 2 points, the third break 3 points, etc. Then these are added together, so your score for a 7-blob combo (provided you didn't use the point-doubling powerup), would be 1+2+3+4+5+6+7=28.
Tips & Strategies
This game may seem random at first, but it's actually far from it. Each move must be carefully plotted in order to clear the board in the given amount of moves. Here are a couple of tips.
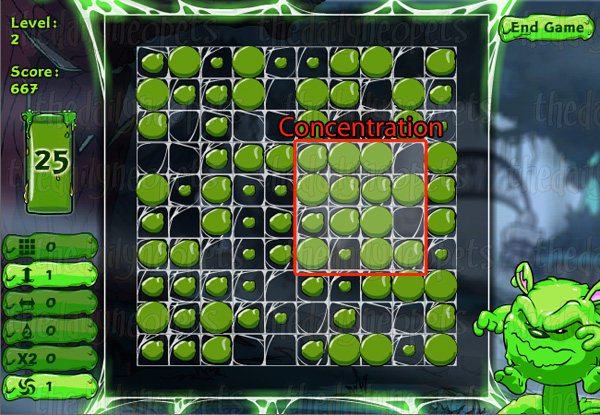
First, focus on where the largest blobs are concentrated. There can be multiple concentrations. A concentration is three or more blobs that are their largest, just before they explode. You want to try and find the "center blob" of that concentration and explode that one; that's how you can get the biggest chain reactions to occur. Simply destroy those concentrations and allow the droplets to make the smaller blobs bigger. I have beaten the first level in ONE MOVE using this strategy.
Second, consider make "2-click" blobs "1-click" blobs, creating your own concentrations (or strengthening ones already there) for bigger and better combos. One click blobs explode if you click them. The size just below that requires two clicks to explode. You may want to consider adding another drop to those 2-click blobs, that's all. Your amount of moves left should ALWAYS break even using this strategy. If you don't think you can break even, don't use this strategy.
After creating your own concentrations, learn when to use the score doubler. Don't use the score doubler if you have a gut feeling that your combo won't be big. Knowing when to use this bonus will greatly improve your score.
When tasked with the tiny blobs, you have a couple options. You can strengthen them by adding to them directly with snot from your meter. Or, you can utilize a burst strategy to capitalize on a chain to finish off the blob enough to break itself, or get it close enough to be broken by a surrounding chain.

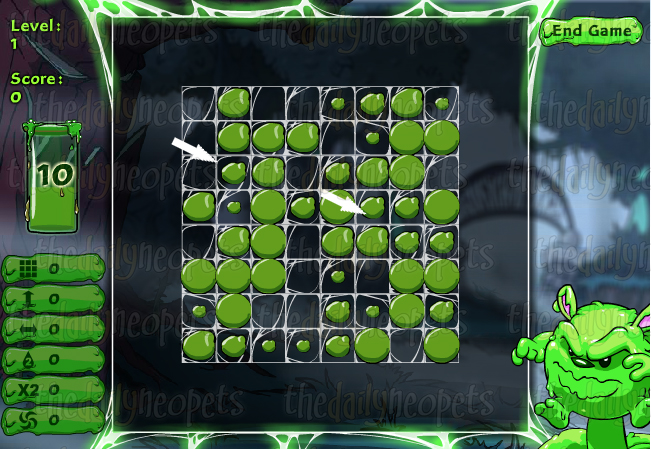
In the image above, we have 4 completed blobs to the right of a mini blob. Because when a blob bursts it sends out one droplet in each of the four directions that travel until they hit the next blob in the way (or go off the edge), when presented with a chain like this you want to use, you will be able to strengthen the tiny blob most by bursting the blob directly beside the blob you want to make bigger. It ensures it will absorb, not only the droplet from the initial burst, but, in this case, each additional droplet travelling left from the remaining three blobs to the right. If you were to burst the blob farthest away from the tiny blob first, only one droplet would make it, as the rest would be absorbed by the subsequent bursting blobs.
Lastly, always use your 3x3 box, column clearer, and row clearer to destroy concentrations of predominantly smaller blobs. You don't want to destroy large blobs, because that's where your chain reactions happen, although destroying one or two of them if you need to won't ruin your game.
In-Depth Strategy
The following strategy is based on tips and tricks sent to us by Ur_Drago and shows players how to best maximize the points they can get from the game
Stage 1
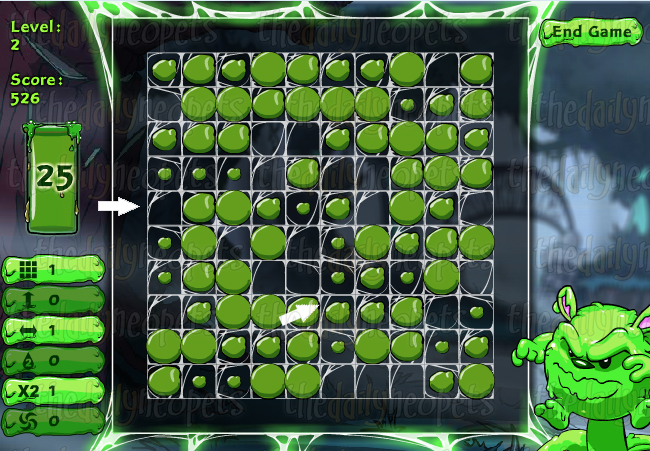
In the first and easiest stage, you are presented with no obstacles, but only 10 blobs to use. We can apply the "create your own concentration strategy" here, just keep in mind you have fewer blobs in order to do so. Above, you can see the two areas that would be useful for creating concentrations. both sections have a lot of blobs that are only one or two clicks away from exploding. Since there are already so many big blobs in these areas, you can use your drops to increase those smaller blobs in the area around it to get them closer to bursting before setting off your chain. A strategy to maximize points in this easy level is to create your own blobs in some of the empty spaces around the edges to catch the excess drops from your chains so they're not wasted by simply flying off the edge of the board. If you choose to do this, the above strategy of bursting chains of the largest blobs closest to the small blob can come in very handy.
Stage 2
Stage 2 is another easy level in that there are no obstacles to worry about on the board. Additionally, you have the opportunity to start with a maximum of 25 droplets in your meter, depending on how many you finished with in Stage 1. A great way to tackle this level is to use your available droplets to bulk up the smaller blobs throughout the board, creating concentrations where possible. Then you can use your "x2 droplet" powerup to finish off the board. Detonating the powerup in the middle of the board will allow it to clear the greatest amount of blobs. As in the first chain, adding in your own blobs in some of the empty spaces around the outside squares of the grid before using the "x2" powerup can greatly increase the amount of points you get from this level.
Stage 3
The strategy for Stage 3 is quite similar to the strategy for Stage 2, as it's a slightly larger version of the same "obstacle-less" board. Build up your smaller blobs, add some extra to the outskirts, and then detonate your "x2" multiplier in the center for maximum effect.
Stage 4
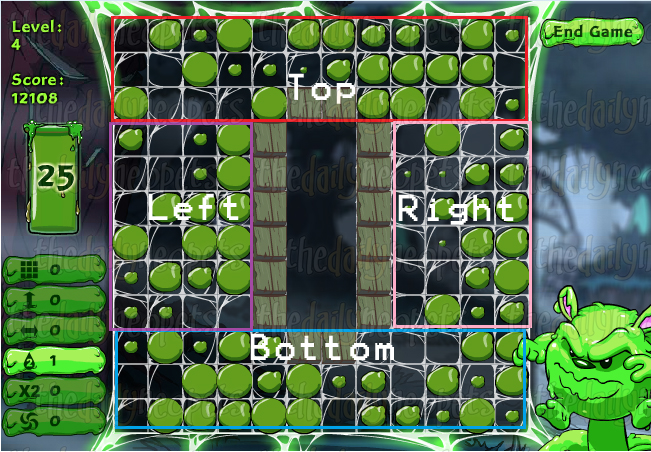
Stage 4 is where it begins to get a little more tricky. Rather than having an open playing area, there is a set of wooden "walls" in the center of the board. When droplets hit these wooden blocks from bursted blobs, they will be absorbed and not be able to burst any more blobs. Because of the obstacles, you will first want to concentrate on the top and bottom sections, as shown in the picture. Try to bulk up these sections so the majority of the blobs are in the second-to-last stage before they burst (so they require two droplets to pop). Once that's finished, try to find an existing concentration in the two side sections, and work on the blobs from the center of the concentration outwards. Like in the first three stages, if you have additional droplets left over after doing this, feel free to add some new blobs around the edges. A handy tip here would be to add these extra blobs in the corner areas. This way, they'll catch the excess droplets vertically and horizontally. If you place them in the middle of the sections, they'll have less of an opportunity to catch these extra droplets because the obstacles are blocking access from one section of the board.
Stage 5
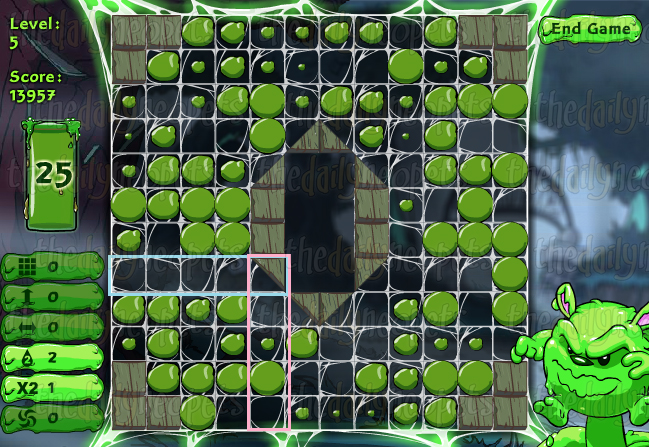
As in Stage 4, Stage 5 has wooden obstacles that will absorb any of your droplets that come into contact with them. However, you'll notice some of them look a little different. Some of the wooden blocks are half blocks cut diagonally and angled in different directions. When a droplet hits one of these, rather than being absorbed, it will reflect off in the angle of the block, causing the droplet to change from a vertical to horizontal path and vice versa. Though you have these additional blocks, your strategy will be much the same as in Stage 4. Focus on the top and bottom sections first, then proceed to fill in the sides. If you choose to add in some extra blobs, pay attention to where droplets will be reflected off the obstacles and use them to your advantage. For example, in the situation above, the blobs in the pink section will cause droplets to reflect into the blue section. As there are no blobs in the blue section, any droplets that reflect into it will continue off the board and be wasted, so it may be a good idea to create a droplet somewhere in the blue section. This is also true when you're bulking up your concentrations. If you notice a lot of droplets will be reflected into a certain area, try to make sure they're put to use and not wasted.
Stage 6
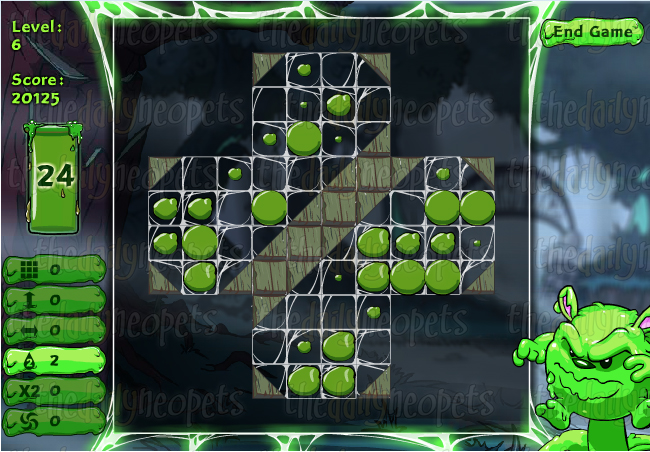
Stage 6 is one of the more frustrating boards. As it's completely divided in half with any droplets from one side unable to reach the other at all, you can treat each side as it's own board. Bulk up the smaller blobs and when you're ready to detonate, try to start in the middle of a concentration. It's best in this stage not to use any powerups unless you're desperate to clear some tiny blobs. The points you would get from the small chains wouldn't be worth the loss of a powerup.
Stage 7
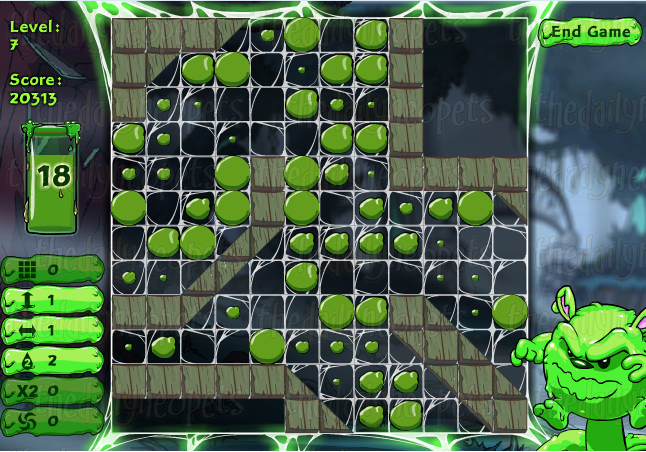
By stage 7, it is extremely unlikely that you'll be able to fill the board enough to be able to clear it with one large combo like in a number of the earlier stages, so instead of aiming for one large chains, you'll be looking to set up two or three slightly smaller chains. In this stage, you'll want to return to the basic strategy of building up concentrations as the first step. Pay attention to where the blobs will reflect and try to use this to your advantage. In this stage, the powerups that can clear rows and blocks of blobs can be very handy. If you're going to use these, try to use them to clear sections of smaller blobs so you don't waste droplets trying to make them useful. I like to use them in areas that are both populated by small blobs as well as low-reflection areas that will see less traffic and therefore, have less droplets to contribute to their bursting This stage is also made a little harder by the fact that it is quite difficult to finish Stage 6 with a full snot meter, meaning you'll likely have less than 25 droplets to bulk up your board before detonating a larger chain. By now, you should also have the "x2" point multiplier (different from the x2 droplet) powerup. Try to save this for a big chain in order to maximize your points. If you have excess droplets left after building up the smaller ones to a size you feel comfortable with, feel free to add some of your own blobs in the high-traffic areas.
Stages 8+
In Stages 8 and above, you're going to be using the strategy that got you through Stage 7. Build your concentrations, add in some extra blobs in high-traffic areas if you're comfortable doing so, and save your multiplier powerups for large chains, paying attention to the areas that will see more droplets from being reflected off the angled obstacles.
Conclusion
It will take a couple of plays to understand this game. But remember that, although it may appear this way, this game is not purely random. If you leave things to chance, you won't get a high score; focus on those "concentrations", strengthen them, remove small blobs, and let the snot fly!
Good luck!
Alerts
 The Snowager
Next sleep in 1h, 20m, 52s.
 Next Possible Wake
Jul 6: 9 AM/PM NST
Jul 7: 2 AM/PM NST
Jul 8: 7 OR 8 AM/PM NST
Jul 9: 12 OR 1 AM/PM NST
 Obelisk War: Battle
Next cycle: 1d, 11h, 20m
Neopia Today
The Runway Contest

Recently At Forums
- Vote for the obelisk War! Round 341
- Monday, July 6
- Sunday, July 5
- Saturday, July 4
- Happy Flotsam Day!