

Grand Theft Ummagine
| Link to Game | Trophies | Avatar(s) | ||
|---|---|---|---|---|
Play now!  |
   |

|
||
| Difficulty Meter | Neopoint Ratio | |||
|
We rate this game somewhat hard.
|
 NP Ratio: 2.50 2500 pts :: 1000 NP |
|||
Introduction
In this game you play as Stan the Kyrii, with the object being to pretty much steal every last thing you can find! Just make sure you stay away from those nasty Elephante guards of course!
Controls and Instructions
You direct Stan with the arrow keys - the only slightly tricky part is that the game board is tilted clockwise by 45o. Basically, this means that the down arrow moves you towards the bottom left corner, instead of directly downwards. The other directional keys are similarly skewed.
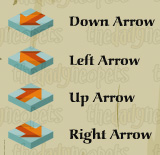
Play around a bit on the first level if you're unsure of how the keys work, the more you play the easier it'll get to remember which keys move you in which direction. Once you point him in a direction Stan will keep moving until he hits something, or you push another key to change his direction. You can also push the key for the direction he's already going in (if he's heading down, push the down arrow again) and he'll stop where he is.
There are two types of things you will have to collect during the game - the foods you're stealing, and a couple of items useful for sneaking past the guards. You have to collect all the food in a level before the path to the next one opens.


 The first of the useable items that you'll come across is the Magical Potion. When you use it, it will allow you to morph into a guard for a short period of time and pass unnoticed among the other guards.
 The Ring of Invisibility is the other object you can pick up and use. When you use it, the guards will freeze in place and you'll go transparent so you can pass them undetected. Just be careful - if you run into a guard you will still get caught!
Once you've collected them, you use these two items by clicking on their pictures in the bottom left-hand corner of the game screen. You can only hold one of each item (i.e. a Potion and a Ring) at any one time, so make sure you've used any you already had before you pick up more in later levels.
Level-by-Level Walkthrough
There are no "lives" in this game, so you can try the levels over and over until you complete them and move on to the next one, which makes the game much simpler!
Level 1 - The End of the Desert
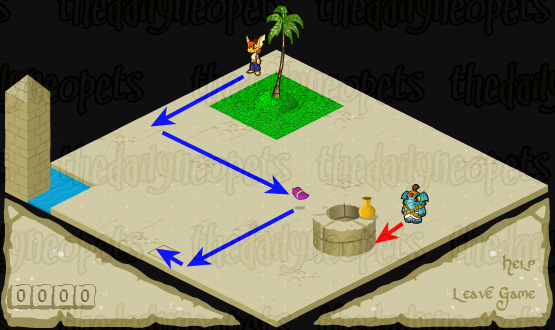
Very straight-forward level, just follow the path in the screenie - the guard will walk one square forward and get stuck behind the well so you won't have to worry about him.
Level 2 - The Outskirts of the City

Follow the path in the screenie, pausing where the X is so that the guard gets stuck between the two blocks.
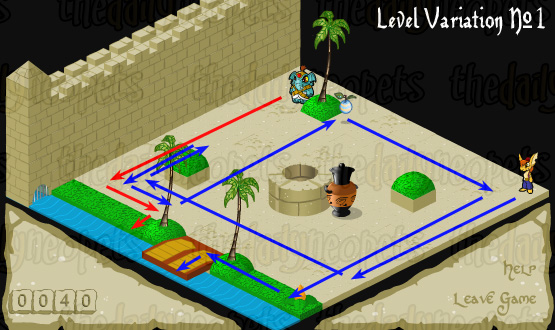
Level 3 - The Last Oasis Before the City
This level has two alternative layouts:
Head down and across, following the path in the screenie. You want to tempt the guard to follow you and then get stuck behind the hedgebox while you go and collect the Tchea fruit.

This variation is slightly harder than the first one, but basically you have to get to the first X and wait there until the guard is nearly to you and then quickly head to the other side and pick up the Ummagine. To get to the ramp you then have to lure the guard so that he is stuck behind the smaller hedgebox in the front (second X).
Level 4 - The Entrance to Sakhmet

Watch out as you begin this level, as the guard will start moving towards you immediately. Apart from that though, this level is much easier than the last one - lure the guard to trap him behind the blocks. Also, be careful of the cracked floor in this level as it'll break if you stand on it!
Level 5 - The Gardener's Revenge
This is the first maze level. The maze is different for everyone, and is three squares high by three squares wide. The exit, however, is always in the top corner of the maze. The easiest way to complete the maze is to pick a direction - say right - and every time you have to pick a path head in that direction. You'll probably have to backtrack a bit, but at least you won't get lost!
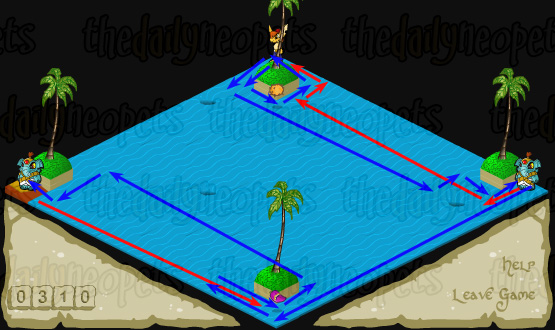
Level 6 - Avenue of the Palmtrees

Again, there are two variations for the layout of this level, but the strategies are the same (albeit opposite). Pick up the Potion first - you won't need it in this level, but it's good to have for later. Then lure and trap the guard behind the well/obelisk (depending on which variation you have) before proceeding down to pick up the Ummagine and head through the trapdoor.
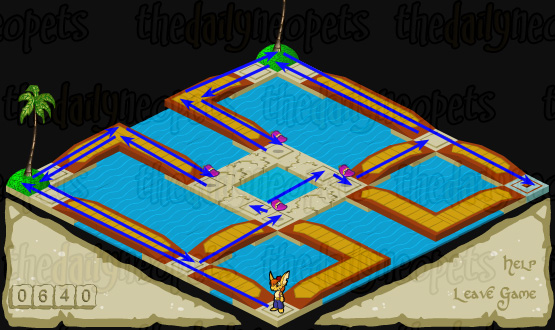
Level 7 - Bridges Over Troubled Waters
Head over and collect the Ring to start with, then make your way back and along the second bridge. Stop where the X is and activate either the Potion you got from the last level or the Ring - personally, I recommend using the Potion as you're going to get another one in the next level anyway. Pick up the fruit and then head over the bridge to the next level.
Level 8 - The Royal Gardens of Sakhmet
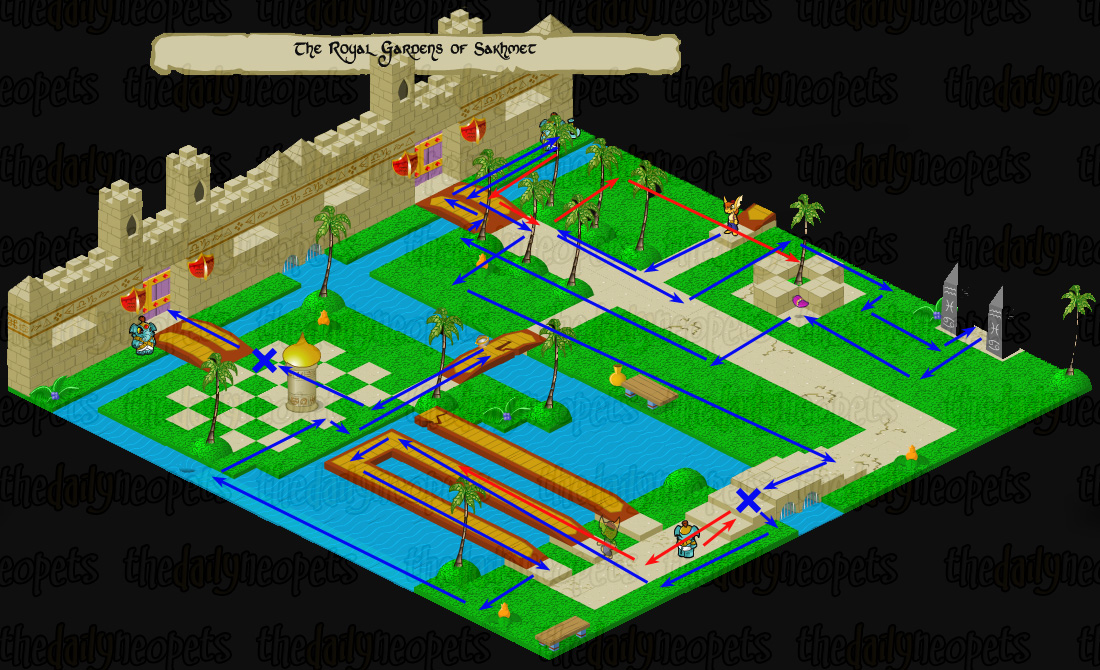
(Click to enlarge)
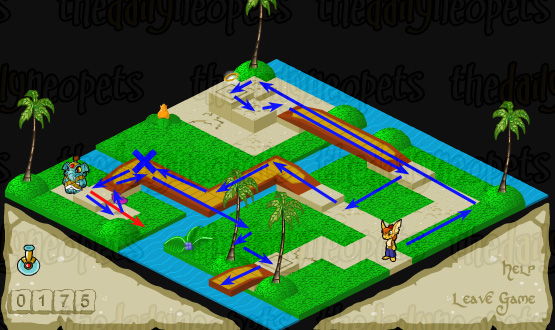
This is a huge level! First you need to lure the guard from in front of the Potion and trap him in the blocks (see screenie). From here, enter between the two obelisks to find The Hidden Pit - the first secret area! Simply collect all the food and head to the blue square to return to the main level.
Once you come out of the secret area follow the path outlined in the screenie to pick up the Ummagine and the Potion. Head back up to the stone bridge opposite the obelisks - be ready to use a Ring here as soon as you cross, because the guard will come at you. Pass around the guard and head down the second wooden bridge. Once your invisibility wears off the guard will follow you, but as long as you got a good head start on him you can go around the bend and he won't follow.
Cross the light coloured water (you can walk on that), collect the ring and then head across the final bridge to the door. You'll need to use the ring you just picked up to get past the guard.
Level 9 - The Three Halls of Insanity
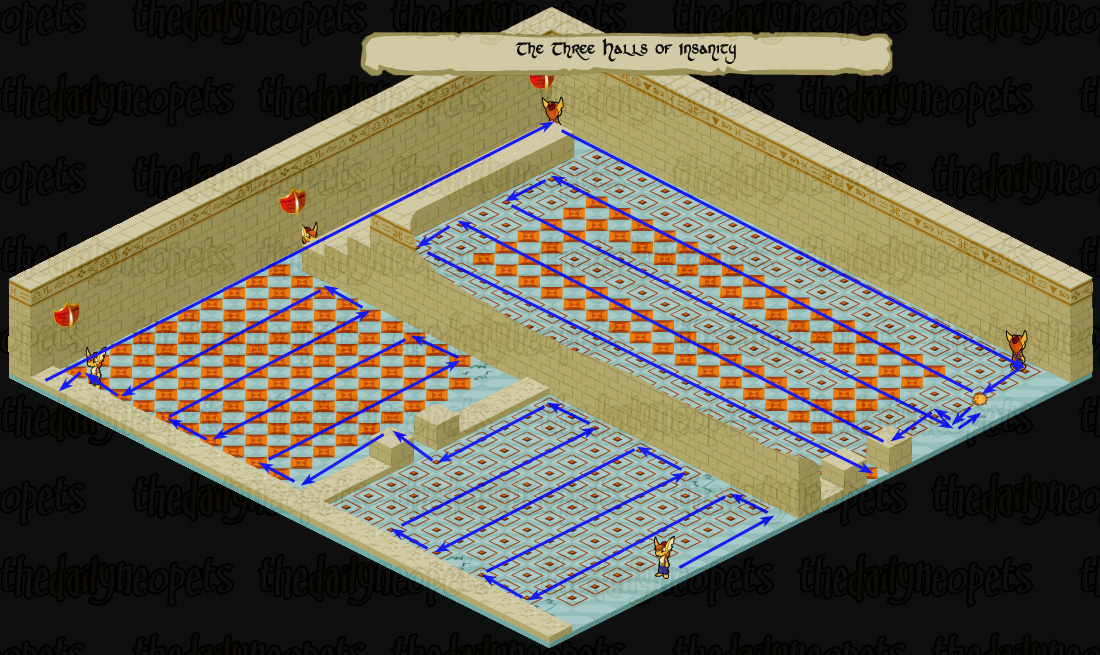
(Click to enlarge)
Follow the path marked on the screenie - if you step onto one of the other tiles you'll fall through. Remember to enter the second secret area, The Secret Temple, at the left of the level.
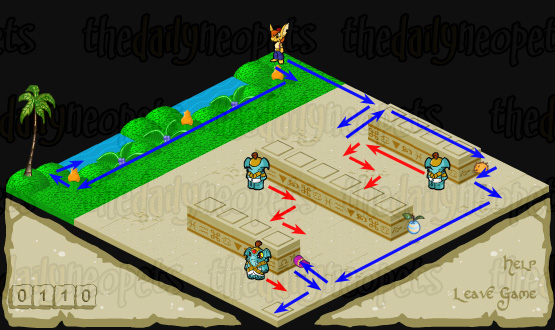
Level 10 - King Stan Meets The Kong Beast
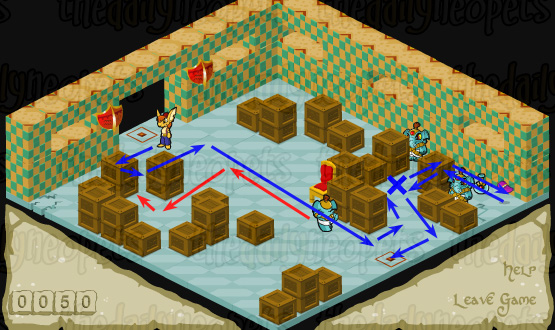
Quickly head down as soon as this level starts, as the guard comes at your right away. Lure him into the gap between the crates (red arrows). Head back up to the other side, use the Potion where the X is and then quickly collect the Ummagine and other Potion. Hurry back to the exit before the Potion wears off.
Level 11 - The Treasure Chamber of Death

Head to the first X and lure the guard in behind the middle formation (red path). Once he's there follow the path outlined in the screenie, picking up the Bagguss before you use your Potion to pick up the Ring - you'll have to move pretty fast so that when it wears off you've got enough of a head start on the guard to pick up the Potion and get to the trapdoor.
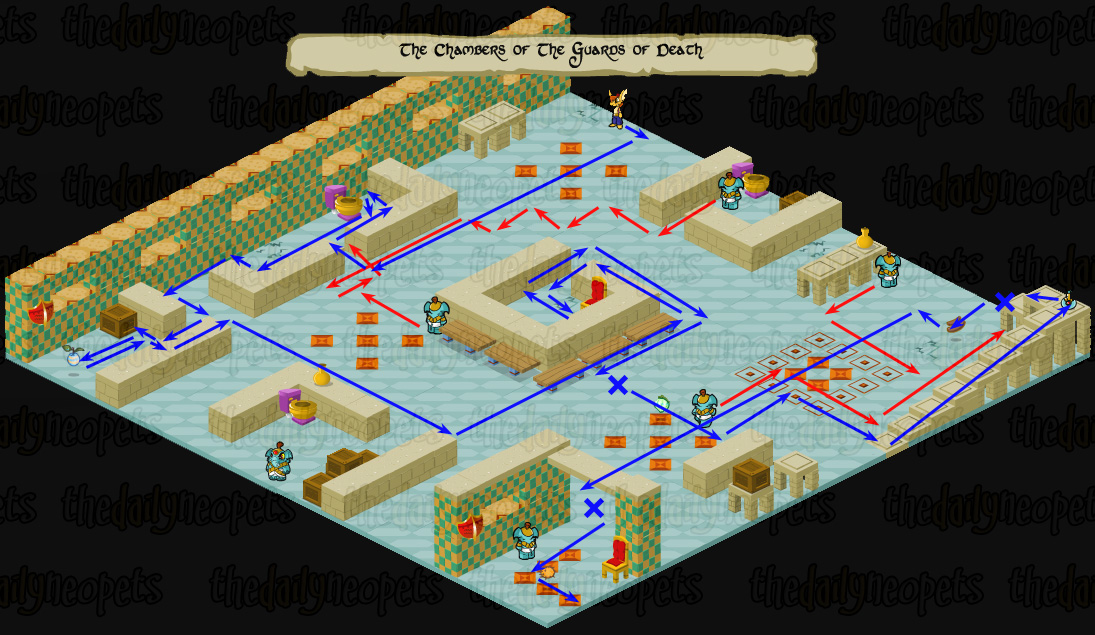
Level 12 - The Chambers of the Guards of Death
(Click to enlarge)
This level is probably the most complicated in the whole game - even with this guide, don't be surprised if it takes you a few tries to get it right! To start with, head right one square and then down and through the gap in the wall. The guard will follow you - make sure he gets stuck on the opposite side of the wall to you, and not in the gap. Follow the arrows in the screenie to enter the third secret area behind the toilet, The Hidden Chamber. As before, collect all the fruit and go through the door back to the main level.
This is where it starts to get tricky. You need to move to the other side of the gap, without letting the first guard get through it... just go quickly and he shouldn't have time to enter it! Now, a second guard will walk down and join the first - wait until they join into one guard and then tempt them to enter the gap so they'll be trapped there. Head over and pick up the Tchea fruit - you'll notice a guard moving, just make sure he doesn't leave his room and you should be fine. Follow the path marked on the screenie to get the Ummagine in the center of the room.
After you've gotten the Ummagine, head back out of the room and position yourself by the Bagguss (where the X is). Use a Potion, and go to collect the Bagguss and then go and stand at the bottom of the stairs until the potion wears off. The two guards will now come at you, so move up the stairs a little and you'll be safe. Wait for them to merge, like the two from the beginning. Collect the Potion at the top of the steps, activate it and head off the stairs to collect the Sphinx Links. It's a race from here - go as quickly as you can along the path marked on the screenie. When the screen changes for the final time, use your Ring and move past the last guard to collect the Puntec fruit and leave the level. Bet you're glad that's over!
Level 13 - The Dungeons of Madness
This is another maze, similar to The Gardener's Revenge - only bigger. Just keep with your chosen direction and eventually you'll get through. As before, the exit is in the top corner of the maze.
Level 14 - Water World
A simple level to follow the last two nasty ones - just follow the path in the screenie. The only thing you'll want to watch out for is that you can fall off any of the bridges and into the water.
Level 15 - The Garden of the Holy Shrine
Head along the edge of the water and enter the secret area - The Royal Cellar. Collect all the Ummagines and exit back to the main level via the trapdoor. You'll get caught by the guard that followed you as soon as you exit the level - as far as I know there is no way to avoid this, however it doesn't matter since the game doesn't have lives anyway and the level will just restart.
Go right from the start, and follow the path marked in the screenie - this level is actually relatively simple. At the beginning, make sure you go out and lure the first guard down to the other end of his wall otherwise he'll be able to catch you at the top.
Level 16 - Endless Boardwalk
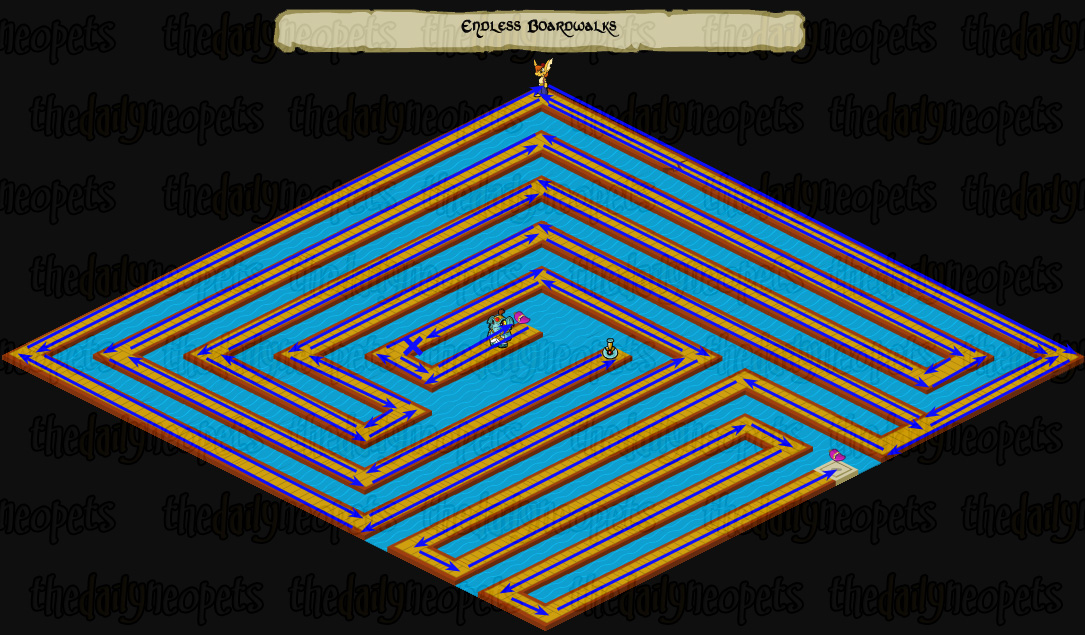
(Click to enlarge)
Endless pretty much sums this level up nicely, it just seems to keep going on and on and on and... well you get the idea. Head to the right to start with - the cracked path is fake - and when you come to the fork in the road take the right-hand one. Walk around in circles until you find and collect the potion - and then head all the way back (no I'm not kidding!) and go to the left of where you started.
Continue around in circles again until you come to where the X is, use the Potion (before using your potion make sure the guard is directly on top of the Ummagine) and quickly go and collect the Ummagine and get back to where you used the potion before it wears off. Go back around (I mentioned the endless part right?) and this time take the left-hand path at the fork in the road. Zig zag a bit until you find the trapdoor. The only good thing about this level? At least you can't fall off the path!
Level 17 - The Raging River
This is the final maze level. Unlike the last two however, the maze is made of water rather than hedges - and if you make a misstep you'll fall in! Stick to your direction and watch where you're going. Try to take single steps when you're near the bits where the screen changes so you don't walk off into the unknown. As before, the exit is in the top corner.
Level 18 - The Swamps of Oblivion
Walk in a circle around the island next to where you start, and tempt the guard to follow you until he gets stuck behind it. Head over and enter the final secret area, The Holy Fishing Grounds, behind where he was standing. Collect everything (don't forget that Potion!) and leave via the trapdoor as per usual. From here, head straight down into the bottom corner and tempt the second guard to come and get stuck behind the island there. Go over to where he was, that's the exit to the next level.
Be careful in this level after you've returned from the secret area - if you die you'll lose 15 points from your score!
Level 19 - Eerie Suburbs
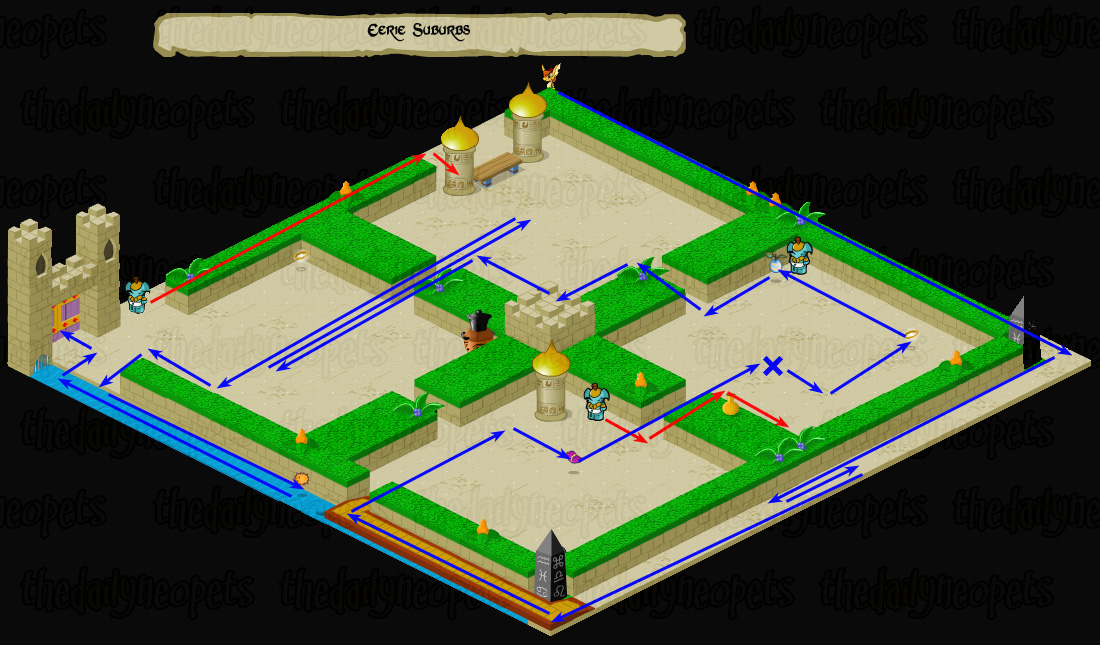
(Click to enlarge)
Head right from where you start, and then down when you reach the obelisk. About halfway down this next stretch you need to lure the guard into the gap and tempt him down the other side of that wall. Once he's stuck there, keep going down and along the boardwalk. Pick up the Ummagine and head through the gap in front of you. As soon as you get through the two guards will start coming towards you - wait as long as you can before using your Potion. Collect the Ring and the Tchea and head through the gap to the next courtyard. You have to do this as quickly as you can so the guards won't follow you though.
Now, go through into the next area and as soon as you see the guard moving turn back - he'll follow your movement along with the wall between you and him. Lure him into the part where the seat is so he'll get stuck there. Head back through to where the gate is, walk on water to collect the Puntec fruit and then move onto the final level via the purple door!
Level 20 - The Path to Sakhmet
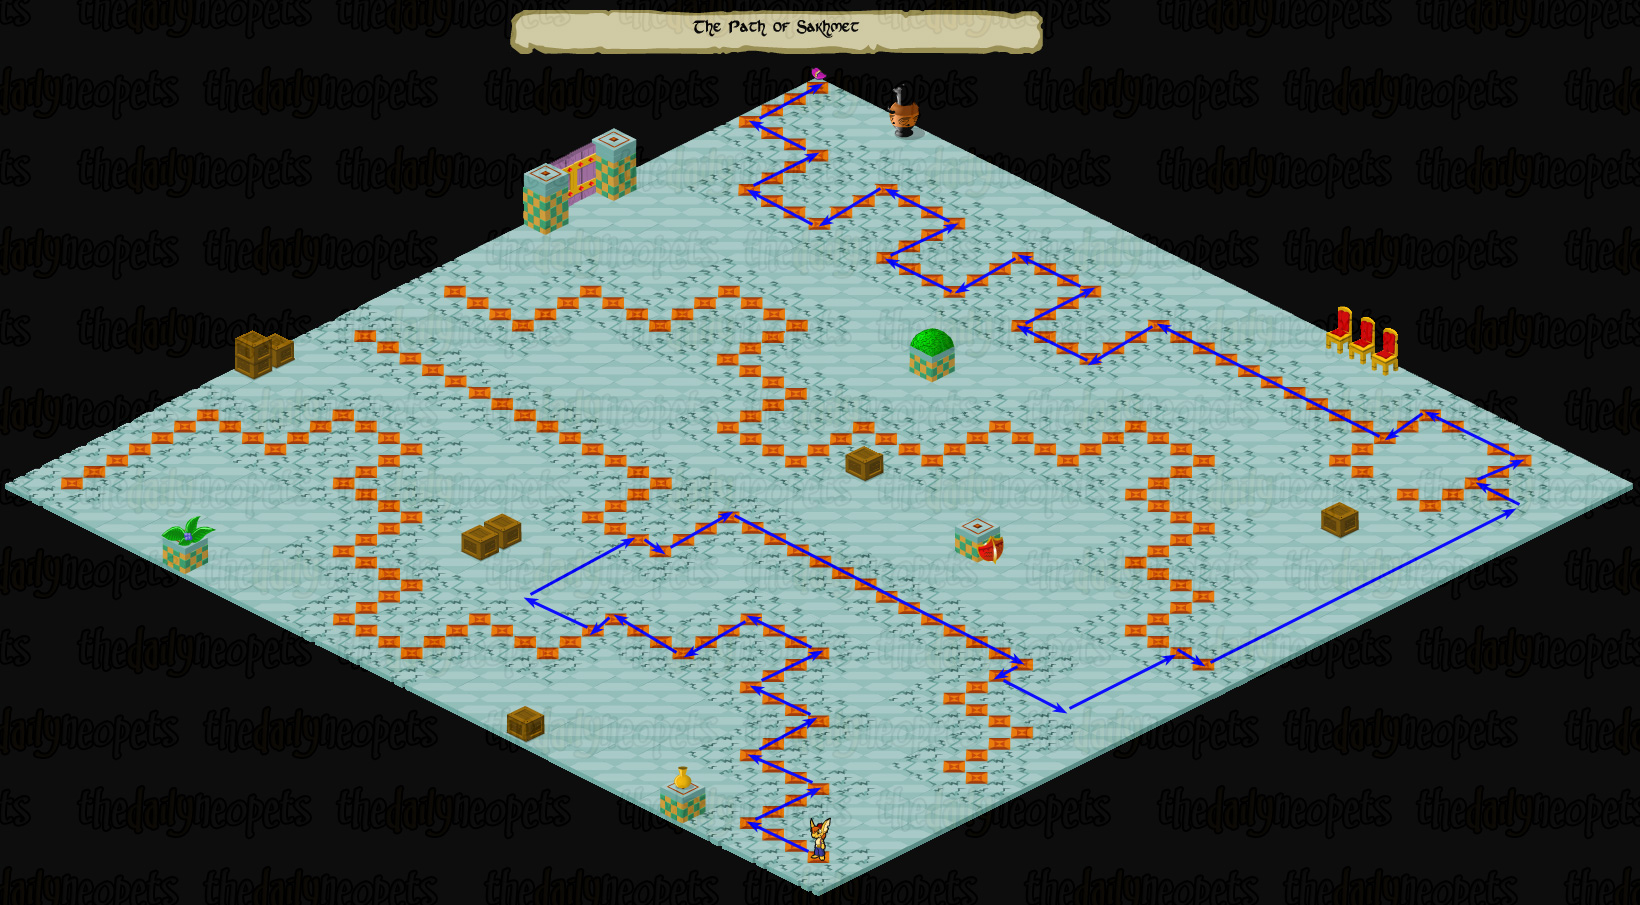
(Click to enlarge)
This level is MASSIVE - and quite honestly, a nightmare to map! However, it's actually a really simple level to finish, especially with a guide, since there are no guards and the only trick is that some of the broken tiles aren't really broken. Simply follow the path marked in the screenie and you're home free!
And... that's it! Congratulations one completing the game, and hopefully you're on your way to getting a fancy new avatar to add to your collection, or possibly even a trophy.
The Avatar
You get the Grand Theft Ummagine avatar when you successfully send a score over 1,100 points. Provided you collect everything, and visit all five secret areas, you should reach the avatar score around the Eerie Suburbs (level 19).
Extra Stuff
You can type in the code ummaginethief at any point in the game to skip a level, however your points will be reset to zero - so tempting as it might be, it's pretty much useless if you want a trophy or the avatar.
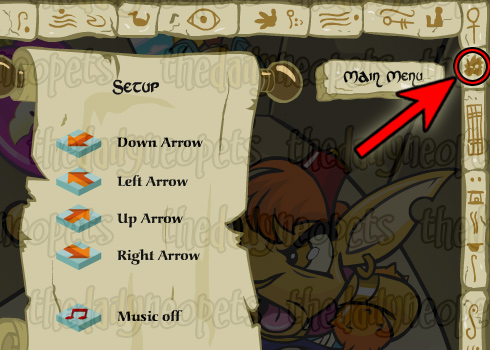
If you click the stylized Jubjub in the right corner of the setup menu then the programmer who designed this game, TPOSG, will appear!
Alerts
 The Snowager
Next sleep in 0h, 3m, 8s.
 Next Possible Wake
Jul 14: 2 PM NST
Jul 15: 7 AM/PM NST
Jul 16: 12 AM/PM NST
Jul 17: 5 AM/PM NST
 Obelisk War: Truce
Next cycle: 0d, 2h, 3m
