Part 8 - The Plain of Peace
| Navigation | ||
|---|---|---|
|
1. The Artefact Thief 2. Nox's Castle 3. Into the Fray 4. Shhhhhhh! 5. Battle For Brightvale |
6. The Shadows Beneath 7a. The Shattered Plain 7b. Oblivion 8. The Plain of Peace 9a. Xandra 9b. The Return of Oblivion |
Trophies and Prizes Corridor of Chance |
Other links:
- Fearless Deeds  - Comics on Neopets
| ||
The Plain of Peace
Xandra must cast numerous spells in order to complete the ritual. The spells are found within the book Brynn found in the archives, but the heroes need your help in order to find the next spell for Xandra to cast. Meanwhile, Xandra has cast a magical barrier to help protect her, Brynn, and Hanso from the shadow phantoms, but the barrier is slowly weakening. Xandra needs you to help replenish the shield as well. If the barrier gets too weak, Xandra will not be able to continue casting the ritual spells until the barrier is strengthened again.
There are two activities available here. One has you deciphering codes for Xandra  , and the other is a community activity where four people work together on maintaining a magical shield
  .
.
Spell Deciphering
If you click on the left option, you will be taken to a page with a list of random Page Numbers, like so:
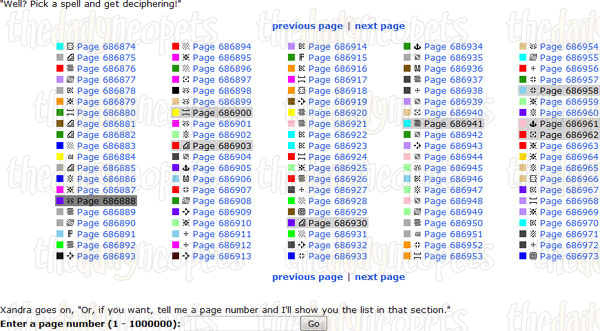
Click on one that is not greyed out. The next page will show you a random code to decipher:
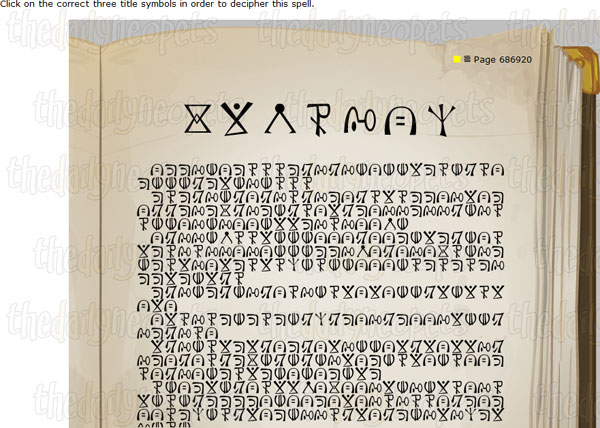
You must click on three of the symbols in bold at the top of the page. Which three? Look over the whole page, one symbol from the title at a time, and figure out which three are used the least or not at all. Click on them in the bold title. Xandra will then tell you "You deciphered the spell! But... hmm... no, this isn't the one I need. Keep looking, though. We'll find it sooner or later!".

Shield Reinforcement
In this community step, you can perform four different tasks that will help to cast a barrier spell around Xandra, Brynn and Hanso. You can either:
- Help stabilize the remnant's energy core
- Help contain the remnant's energy core
- Help guide the remnant to the barrier
- Help suppress the remnant's energy spikes
Stabilization
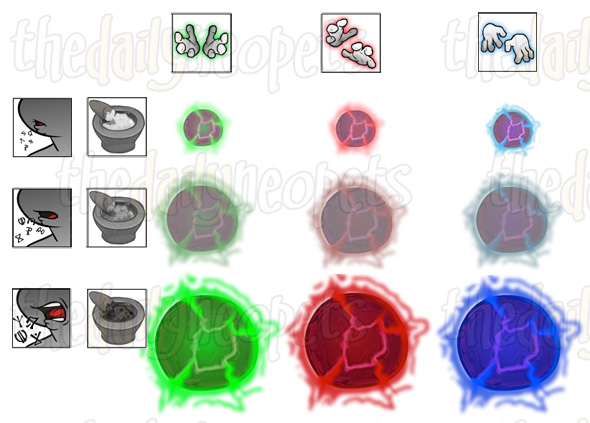
If you decide to help with stabilization, your job is to keep the core of the spell stable. Each spell is made of somatic, verbal and material components. The image below gives you an idea of the interface.
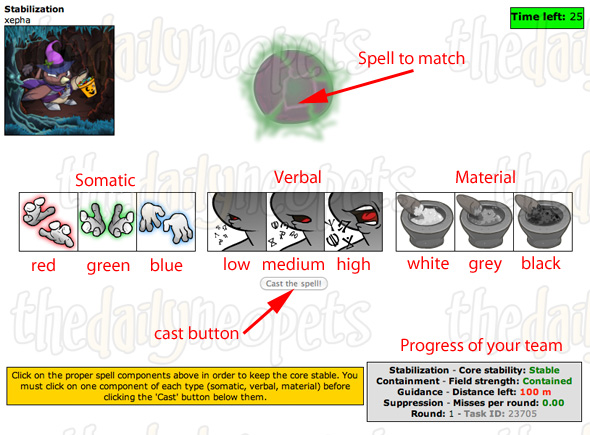
Each spell that is presented to you at the top of the interface has a color tint (red, green, blue), a size (small, medium, large) and a saturation (white, grey, black). The hardest part of this task is to decipher which saturation to use. Select the appropriate components by clicking on them. Once selected, the background of the button turns yellow. When you are sure about your choices, click on 'Cast the spell!' Once the countdown in the top right corner reaches 0, the spell is cast and the page refreshes. The results for all the actions performed by your team are displayed in the bottom right corner. Core stability should read 'stable'. Refer to the chart below for a visual explanation:
Containment
Containment is by far one of the hardest parts of this plot. The simple idea is that you make sure the energy around the orb stays where it is and it does not go beyond its boundaries too much. You have 12 hands, or you could call it 6 pairs of 2, on the right which all stand for something. Below is a useful chart to have next to your containing.
| # | Icon | Effect (use in between these percentages) |
|---|---|---|
| 1 |  | Maintains strength (60% - 70%) |
| 2 |  | Increases strength slightly (50% - 60%) |
| 3 |  | Increases strength (40% - 50%) |
| 4 |  | Increases strength heavily (< 40%) |
| 5 |  | Decreases strength slightly (70% - 80%) |
| 6 |  | Decreases strength (> 80%) |
As you can see each hand stands for a different addition to the parts around the orb. The first 4 hands increase the percentage, while the bottom 2 will decrease the percentage. The first two will basically add little to nothing to your percentage, so you can add them to stable percentages (50% - 70%). Once you get one of your percentages in yellow, it is wise to add a little bit (the 3rd hand) or decrease it a little bit (the 5th hand), depending on whether it's too low or too high. Once they get in red you should sound the alarm, and increase it extremely by using the 4th hand, or decrease it a lot by using the 6th hand.
Now that does not sound so hard does it? Sadly enough you will have no idea when a part will go up or down, sometimes they will restore themselves while you put a hand on it, meaning that it will either get way too low or too high again. So if you think they are in a decent range, you might as well not use any hand on it. You don't have to have all 6 parts covered by a hand.
As long as none of your fields are in red, your status will be Contained and you will be in no immediate danger. However, if one of your fields does slide into the red (< 40% or > 80%), your core's field strength will start to drop. It will go from Contained to Volatile to Rupturing, progressing one step for each round while you still have at least one field in the red. If you manage to get all your fields out of the red, it will revert immediately to Contained. On the other hand, if the field is Rupturing and you still can't manage to get rid of your failing fields, then the containment will fail altogether and you'll have to start over.
Some useful tips are:
- You do not need to have all 6 parts covered. You can leave those in the green as they are.
- Try not to use two of the same hand in one turn, unless completely necessary. If you by any chance need it on the next turn, you might not have it available.
- If the green percentages are getting near 50% or 70% you might want to increase or decrease them if there is nothing else to do. It's always good to keep things balanced as much as possible.
Guidance
If you decide to help with guidance, your job is to move the orb closer to the barrier by pushing it with four limbs: left arm, right arm, left leg and right leg. Your push can have different intensities: none, weak, medium or strong. The image below gives you an idea of the interface.
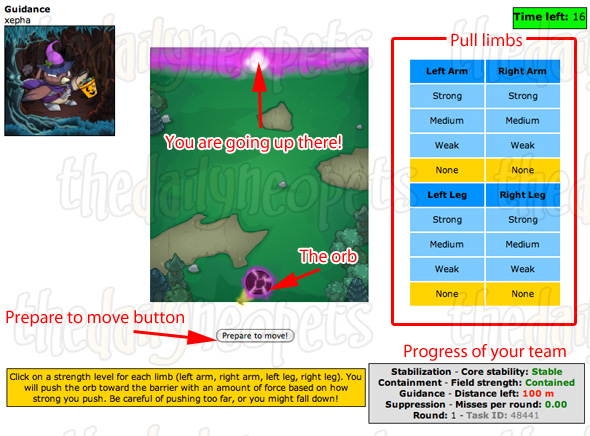
You can click on a strength level for each limb to select it, turning the background yellow. Once you have clicked on the 'Prepare to move' button, it puts the selected options between two double arrows. Guidance is essential to the completion of this step - your group can only succeed once the distance left reaches 0 m. There are many outcomes possible after your move: the orb can move closer to the barrier, it can move farther from the barrier, or you can even waste a turn if you push too hard.
Your left arm and your left leg are effectively identical - they both push up and to the right. The same goes for your right arm and leg, except that they push up and to the left instead.
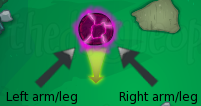
You might notice a yellow arrow pointing out of the orb. This indicates the direction the orb itself will try to pull.
Your first instinct might be to set all your limbs to strong to get the orb to move as far up the field as possible. Unfortunately, this doesn't work very well - if you push that hard, you'll fall over and you won't be able to do anything for one round. In fact, the strongest push you can make on the orb without falling over is two strong limbs, one medium limb, and one weak limb. The trick is in how you distribute these limbs.
Figuring out which limbs to use is mostly common sense - you want to guide the orb up into the gap in the shield. The orb will keep on trying to move to the left or the right, so you'll need to adjust your pushes to compensate and keep the orb on a fairly straight path. The simplest way to do this is to keep both legs on strong, one arm on medium, and one arm on weak, so that you push slightly towards your weak arm (using strong arms and varying legs works too). By adjusting which arm is on medium and which is on weak, you can nudge the orb to the left or the right.
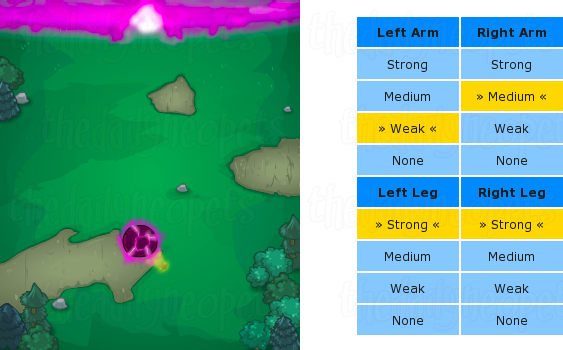
The orb is trying to swing to the right, so I nudge it towards the left to compensate.
Once the orb gets close to the target (around 20 m), you may need to push it a little harder to the left or right if it has strayed too far from the centre and/or is pulling away. You can do this by setting one of your arms to none instead of weak (medium sideways push), or by pushing strongly with both limbs on one side, and weakly with both limbs on the other (strong sideways push).
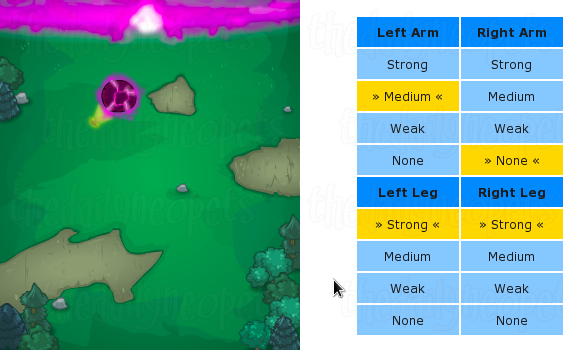
Just a little to the right...
Suppression
At the suppression station, your job is to protect your teammates from dangerous energy spikes that can erupt from the orb without warning. Well, not entirely without warning - before a spike leaves the core, there'll be a little pre-spike shown at the point where it will emerge. On each round, you will need to locate all of the pre-spikes, and place one shield opposite each of them in order to block the spikes. Here's an example:
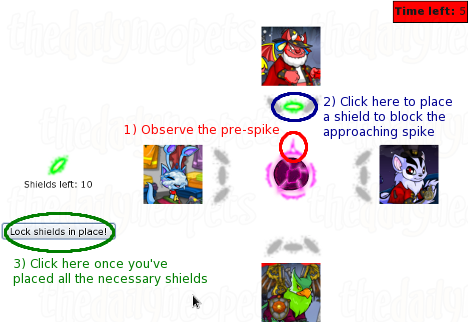
There are twelve possible paths that a spike can take (three paths towards each person), so you will often need to place multiple shields in one round as spikes head towards different people. However, a spike won't strike down the same path for two rounds in a row (this is fortunate, since you can't place a shield in a position which has been hit by a spike). Additionally, there's a maximum of one spike per person each round, so if you've spotted and blocked a pre-spike aiming at one person, you can move on to your other team members right away.
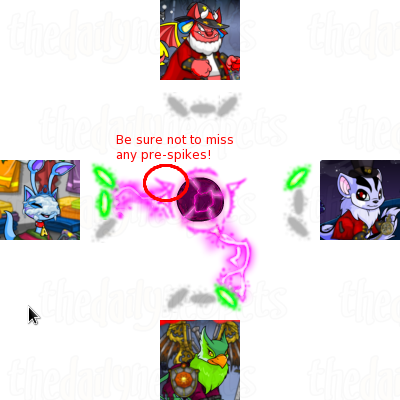
Watch carefully! Energy spikes can sometimes partially conceal pre-spikes.
Remember that shields only last for one round when placed. To make matters worse, you have a limited number of shields - you start out with a total of ten, which goes down for each shield that you place. While you do receive one new shield per round, you'll also normally be using up at least one shield per round, meaning that your shield count will only go downwards. You'll eventually run out of shields no matter what you do, but there's one trick you can try to stretch out your supply for as long as possible: prioritizing.
Of course, you should aim to protect everyone in your team while you can, but once your shield count drops below five, you really need to start worrying about your supply. This means that if you get too many pre-spikes in one round (three or more is a good starting point), you will have to let one or two of your team members take a hit. This can often cause problems, but if you have enough awareness of what's going on, you should be able to balance things out.
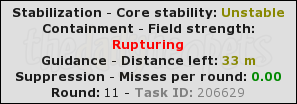
The status box is an important tool.
Allowing the stabilization station to take a hit is usually quite safe, as they can easily recover in the next round. However, if the core stability is critical or unstable, you may want to keep them covered, as the destabilisation can make containment very difficult.
Generally you want to protect the containment station as much as possible, as their field strength can drop without any warning whatsoever, even when the fields are all in the green, leaving them unable to compensate before the field fails entirely. If your containment person gets hit while their field strength is volatile or rupturing, you can almost certainly kiss your core goodbye.
While having a stunned person in the guidance station won't directly threaten the integrity of your core, it will mean that you won't get any closer to the barrier, effectively wasting a round.
Last, but not least, make sure that you never allow yourself to be stunned. No, that's not being selfish - if you're stunned, you will not be able to place any shields for the next round (the interface will seem to let you, but you won't have any effect), exposing your entire group to the energy spikes. The core has a nasty habit of stunning you repeatedly, leaving you unable to do anything while it demolishes the rest of your group. The only time when you can let yourself take a hit is if you're sure that you're only one or two rounds away from success. At that point however, you don't have to worry much about conserving shields either.
In summary, once you start to run low on shields, you should prioritize:
- Suppression (most important)
- Containment
- Guidance
- Stabilization (least important)
Be sure to keep your teammates' statuses in mind too!
Overall Progress
The main page  for this step displays our overall progress.
Barrier strength: 66%
Currently casting? No
Current spell progress: 0%
Next spell found? No
Spells completed: 2
The Barrier strength measures the integrity of the magical barrier protecting Xandra as she casts the spells she needs. If it drops too low, Xandra won't be able to do any spellcasting. You can help to increase this by working to reinforce the shield.
Currently casting? and the Current spell progress indicate if Xandra is currently working on casting a spell, and how close she is to finishing it.
Next spell found? indicates if the next spell for Xandra to cast has been found yet. You can help to find the next spell by deciphering some codes.
Spells completed shows the number of spells that Xandra has cast so far.
The Fearless Deeds
 Errand Spelling
It's so handy having thousands of minions every time something puzzling comes up.
Successfully complete one spell and one group challenge.
 Cast Away!
Everyone gets an achievement! Even this inanimate carbon rod!
It seems like everyone who has been helping with this part of the plot is now receiving this achievement when they visit the Plain of Peace  page. You may need to refresh a few times, and it's possible to receive the achievement without seeing an alert.
 Jack of All Stations
I swear, if I get stunned one more time...
Successfully complete all four group challenges.
Alerts
 The Snowager
Next sleep in 0h, 25m, 26s.
 Next Possible Wake
Oct 28: 2 AM/PM NST
Oct 29: 7 AM/PM NST
Oct 30: 12 AM/PM NST
Oct 31: 5 AM/PM NST
Neopia Today
The Runway Contest
Recently At Forums
- Tuesday, October 28
- Happy Korbat Day!
- Monday, October 27
- Vote for the obelisk War! Round 323
- Sunday, October 26


