
Galleries
The Purpose of a Gallery
Do you want to display all of your wonderful items you collect? Then a gallery is just what you need! A gallery can provide you a place to place all of your precious items for everyone to see!
Making a Gallery
You can find a link to get to the item gallery section in your inventory and in your shop. If you haven't already set up a gallery a page will come up with some info and a place to click to create your gallery. If you have created a gallery then your gallery will show up!
The Important Links
The screenie below will show you what the links look like that we will be talking about from here on out!

Edit Description
The edit description screen looks like this:

This is where you will need to start! This is pretty self explanatory. The gallery name part is where you put what you want your gallery to be named. If you are going to collect dung you could put something like "Dung Collection". Try to come up with something catchy, after all this is going to be the name of your gallery!
The Gallery setting is just where you want your gallery to be located. If you plan on making a Tyrannian based gallery, then Tyrannia would be a good place to make your setting!
The gallery description section is just like your shop description! This is where you would put any codes you may have for layouts, blogs, or any other graphics you want. You would also put anything you want to say to people visiting your shop in here. Most shop layouts work in galleries as well!
The gallery keeper picture is simply the character you want to be displayed on your gallery, just like the shop keeper in shops. Obviously if you click do not display gallery keeper to visitors then they won't see the gallery keeper. You will want to make the gallery Keeper picture's background transparent by clicking the "Make Transparent" box. If you do not your gallery keeper will have a white square around them and that's just not pretty! The name part is what you name the gallery keeper and Greeting is what the gallery keeper will have under them as saying to your guests.
Create or Edit Theme Category
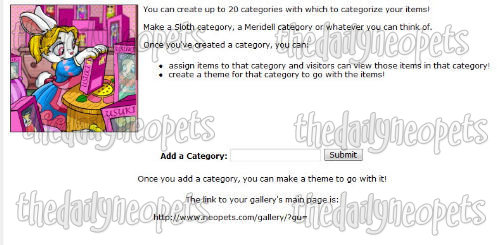
So, let's say you are collecting a wide range of items for example, petpets and toys. This is where you can create categories so your petpets show up in one category and your toys in another. You can have up to 20 categories in your gallery. To create a category simply name the category such as "toys" and enter that into the box labeled add a category!
Once you have a category the page will change in look, under the original screen will be some more stuff!
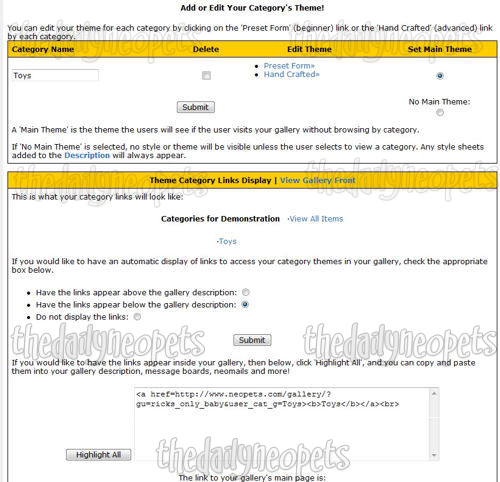
The first part of the screen is where you can edit the name of the category, delete the category, edit the theme of the category, or set it as a main theme. Setting it as the main theme just means when someone comes to your gallery that is the category they will see first. So whatever category you want seen first chose that for the main theme. Or if you chose no main them people will have to click on the categories that will show up when the view your gallery.
The edit the theme of the category section has two options: Preset form or hand crafted form. This is where you will change the background, border, font, and table properties. Each category can have its own layout! The preset form will look like this:
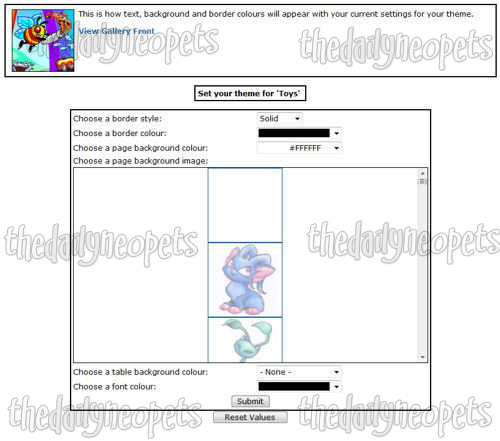
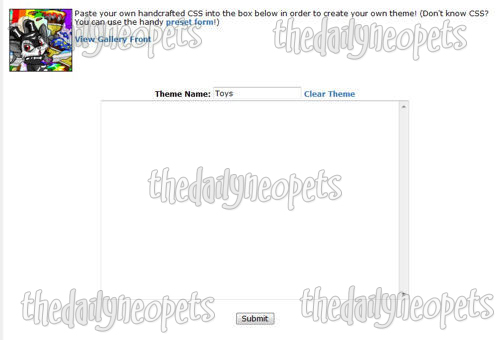
Here you will enter CSS for a layout. If you do not know how or do not have a premade from someone else that you are using then the preset form is for you!
The next section of the category page is for your links. You can decide where you want your links to your categories to appear, and in the scroll box is the code you will need if you want to add a link on neoboards, your shop, or anywhere else!
Galleries by World
Clicking on this link will send you to a page that you can chose a certain world. This will cause a random search for galleries in that world and show you the names of the owner and the gallery! This is just a nifty way for you to look at other members' galleries.
FAQ
Pretty self explanatory: it's just facts, answers, and questions about galleries. If you need to know something and it wasn't covered here, trying checking there for your answer!
Quick Stock, Shop Stock, SDB and Inventory
The inventory link, the shop stock link, and SDB will lead you to your inventory, your shops stock, and SDB. I am not going to cover that because you probably already know what that is! The Quick stock link will lead you to the same place as the quick stock link does in your shop and inventory. You can place things in your inventory into your gallery using this link.
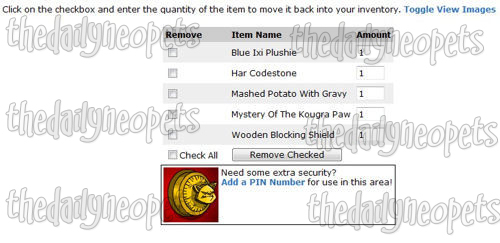
Remove Items
Decide you didn't want an item in your shop? Simply go to remove items, look for the name of the item change the number to however many you need to remove, make sure the box next to the item is clicked and hit remove checked!
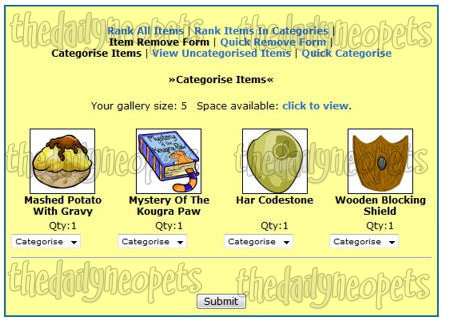
Categorise Items
This is where you will go to place your items into the right category. First use the scroll box to chose your category you want to put items into.
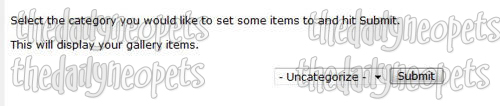
Next you will choose what items you want to categorise.
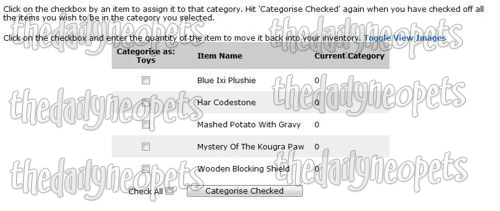
Looking at the screenie of the page should really show you how to do it. For a quick example, I am in the toy category that I created so I would click the box next to the blue ixi plushie and hit categorise checked because it's the only toy I have in my gallery to put in the toy section. The part saying current category will show a 0 if you do not have the item in a category, and it will show the name of the category if it's in a category already.
Shop Blogs
This link just leads you to the shop blogs on neopets and you can copy one of those and put it your gallery description if you want to put one on your gallery.
Main
Below is how the main section will look after adding your items and doing some of the changes with the preset form. Remember, it won't look exactly like this. This is just what I did for an example!
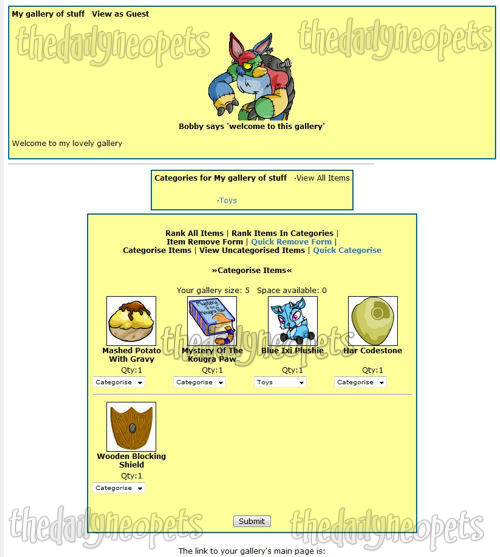
Under each item you can chose a category for them on this form as well as through the categorise link previously discussed. Next to the name of your shop is a link that says, view as guest. Clicking this will show you exactly what people will see when visiting your gallery. That will change to a link that says edit mode, chose that to get back to the way it looked before so you can continue to edit. As you can see in the screenie we now have some new links that show up just above your items. They are called rank all items, rank items in categories, view uncategorised items, and quick categorise.
Rank All Items
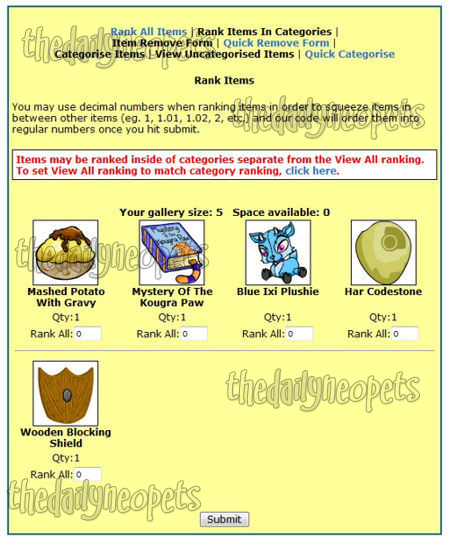
This is pretty simple really! This is where you chose what order you want the items to show up in when people look at your gallery. The rankings you chose in the rank all section will order them in whatever way you chose when people chose to view all, when looking at your gallery. When ranking items you can use decimal points. For example say you have 53 items in your gallery. All of them were ranked but you just add one item. You do not want that item to be the 53rd item, but you want it to be the 32nd item in your gallery. Since you already have one ranked at 32, to make the new item 32 you would simply put a decimal, such as 31.5. Once you hit submit it will automatically change its ranking to 32.
Rank Items in Categories
Similar to rank all items, but this will show you ONLY what you have set into a category. I have the toy category with the blue ixi plushie in it only so that will be the only item that shows up in mine. However if you have multiple items in a category you can rank them in the order you want them seen in that specific category. So if a person views just your toys, they will see those toys in the order your ranks were in that category. Remember you can use decimal points when ranking, which makes things much easier if you have many items.
View Uncategorized Items
If you have added some items and need to put them in the correct category, this is a much simpler way that going through the categorise items link when you have many items. This ONLY shows you items that do not have a category. You just use the scroll box to choose the category it needs to go in and hit submit and it will now be in the correct category.
Quick Categorise
This is the same as the categorise link previously mentioned! That makes things pretty simple doesn't it!The Finished Product!
You now know the basics to creating a gallery! You should be able to successfully make your own gallery and understand what each of the links in the gallery mean!
Gallery Spotlight
Now that you have created your gallery, if you're happy with your final product you can enter it into the gallery spotlight! The gallery spotlight is a competition where you and other neopians compete to win the gallery spotlight, voted on by TNT staff.
Alerts
 The Snowager
Next sleep in 1h, 13m, 20s.
 Next Possible Wake
Jul 27: 8 AM/PM NST
Jul 28: 1 AM/PM NST
Jul 29: 6 AM/PM NST
Jul 30: 11 AM/PM NST
 Obelisk War: Truce
Next cycle: 0d, 19h, 13m
